Sometimes We want to add watermark or logo to our multiple Photos. This work will help you protect your photos and not allow someone to copy. If you are one of the many designers, you use web to share your photos with client. One of the major concerns is that someone out there is going to steal your photos. You can’t stop them. But you can make difficultly for them by adding watermark or logo to your photos. There are many ways to create a watermark or logo on photos. How to add watermark and logo in Photoshop ?
For example, My website’s images are added text “Photoshoptip.com”. Because I want to prevent someone form taking my images. But I’m using plugin for my website. In this tutorial, I will show you how to Add a Watermark to an Image in Photoshop CS6. This tutorial has been tested in Photoshop CS 5, CS4, Cs3 and Photoshop Creative Cloud ( Photoshop CC). Add a copyright watermark pattern to a photo with Photoshop when you think this work is needed. I also introduce a software can make watermark for multiple photos in the end of this post.
To create a watermark, you have to make a logo or a picture information then you add them to main picture. So that, I will divide by two main step. First step : create the copyright document, second step : add copyright document to main photos
I will use this photo (1016×735 pixel) to make tutorial. This photo will be added text “Photoshoptip.com”

How to add watermark and logo in Photoshop CS6
FRIST STEP : CREATE THE COPYRIGHT DOCUMENT
Step 1: Laugh Photoshop CS6 and create a new document with a transparent background (How to open Photoshop CS6)
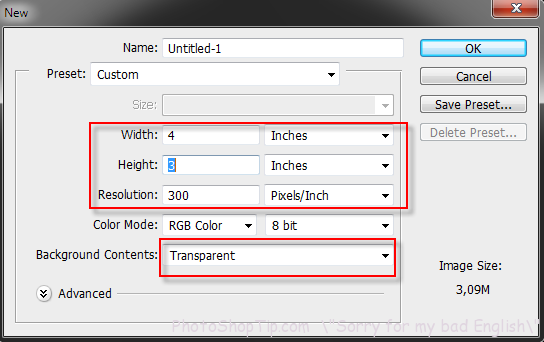
Go to File menu -> Select New. You will see a dialog box, you can change option as follow :
– Width : 4 inches
– Heighs : 3 inches
– Resolution : 300 pixel/Inch
– Background content : transparent (IMPORTANT)

New dialog box in Photoshop CS6
Click ok -> The blank document with transparent background will open

New document box with transparent
Step 2: Type Your Copyright Information
In this tutorial, I will type “© 2014 Photoshoptip.com”, if you want to use Copyright symbol “©”, you can press Option-G on a Mac, or hold down the Alt key on Windows and enter 0169 on the numeric keypad (read more : How to Insert Special Text Characters Symbols in Photoshop).
Tip : You should choose black color for text

Copyright information
Step 3 : Rotate The Text With Free Transform
The watermark look better with rotate text.

Rotate text in photoshop cs6
Step 4: Trim The Document Around The Text
Go up Image menu next and select Trim. Under Base on option, click transparent pixel
trim photo with transparent pixel
Click ok . Transparent will be cut around text

trim text in photoshop
Step 5: Define The Text As A Pattern
Go to Edit menu -> select Define Pattern . The define pattern dialog box appears. Type a name for pattern. I will type “watermark”

Pattern dialog box in photoshop
Click ok
SECOND STEP : ADD COPYRIGHT DOCUMENT TO MAIN PHOTOS
Step 1 : Open a photo that you want to watermerk (How to open an image in Photoshop CS6)
Step 2: Create a new layer
Step 3 : on the new layer. You go to Edit -> Select Fill -> The Fill dialog appear

Fill dialog box
In content option :
– Use : pattern
– Custo pattern : for example, I chooose “watermark”
Click ok
Step 4 : Adjust layer setting
Choose Overlay and opacity about 50%

layer setting
My product

Product watermark and logo in Photoshop
Bonus : If you want to use software to watermark multiple photos. You can use Batch Watermark software
Thanks for your reading ! Goodluck .


Nice article,but this can be done quite easily in bulk with this software Mass Watermark
Thanks for your comment! I will learn it too!