In this post, I will guide you on how to blend sunshine color. Sometimes, we take a photo in a sunshine lacking environment or you just want to change the background for your photo. So, how to add some “sunshine” to the photo? I will give instructions on how to blend sunshine color. In the last post, I gave instructions on how to blend pink purple color (How to blend violet shine color in photoshop). I have tested scuccessfully in Photoshop CS6 and Photoshop CC
Step 1: First, open this photo with Photoshop, Miss Lovely Thanh Hang from Fiona
If you look more closely, you will see that her skin is not very smooth, right. So, for the first step, let’s smoothen her skin to be more attractive. ( How to remove acne and smooth skin in Photoshop CS6 )
Step 2: Press Ctrl+J twice to double current layer into Layer 1 and Layer 1 copy
Step 3: Select Layer 1, go to Filter > Blur > Gaussian Blur … and set Radius to be 3 pixels
Change mixing mode for Layer to Overlay
Step 4: Select Layer 1 copy. Go to Filter >Blur > Smart Blur … and set Radius: 3 pixels, Threshold: 4.5, Quality: Low, Mode: Normal
Step 5: If you see that, after adjusting, there are unnatural square prominent sections on the photo, or just her skin doesn’t seem smooth, then use Smudge tool with Strength of 14% and make a gentle brush, then it is ok
Then the photo should look like this, see! our mod’s skin seems better smoothened, right.
Step 6: That’s it. Now to the Blend part. First, create a new Layer, then press Ctrl+Alt+Shift+E for a mixed layer as a result of the steps you have just done, name it Layer 2
Step 7: Select Layer 2, go to Filter > Blur > Gaussian Blur … and set the value as illustrated in the image
Switch mixing mode of Layer 2 to Soft Light and reduce Opacity to 50%
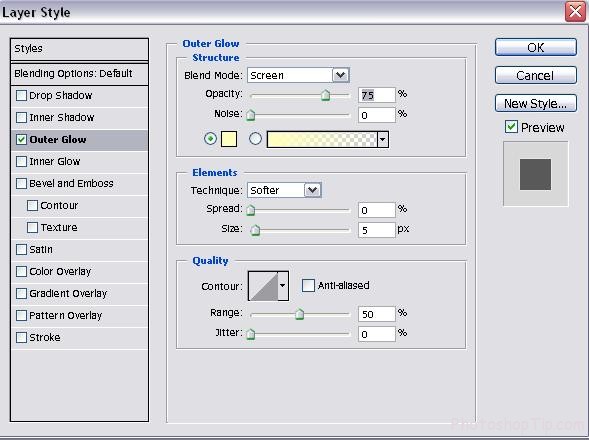
Step 8: Press Ctrl+J to double Layer 2 and change mixing mode to Screen
Step 9: Then, you now download this photo from the package, and open in with Photoshop (you can zoom in or out to fit to the size of the photo that you are blending – and the size of this “Thanh Hang” photo is 550 x 366)
Then, use Move (V) tool to drag it into the photo that I am blending here
Step 10: Switch mixing mode of Layer 3 to Soft Light and reduce Opacity to 50% That’s it. Now, I think I will use Eraser (E) tool to make a gentle touch here, at our mod’s face (value of 30% should be just okay)
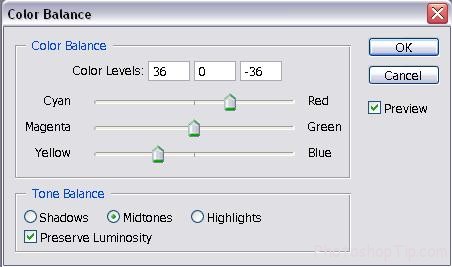
Step 11: Then go to Layer >New Adjustment Layer >Color Balance or just follow this image
Adjust the value: Color balance : +36; 0: -36
Tone balance: Midtones or set values as illustrated in the image, it is ok (but any problem there is, and you will not be able to view the photo then)

Midtones or set values as illustrated
Step 12: continue adjusting Color Balance once more with values
Color balance : +15; 25: -20
Tone balance: Midtones
Step 13: Go to Layer >New Adjustment Layer >Brightness/Contrast or just follow the image
Adjust the value:
Brightness :-11
Contrast: 11
Okay, now the photo should look like this, ha ha, isn’t that beautiful?
Step 14: now, it seems the blending part is fine. Now, let’s make some beautiful decoration.
Go to Layer > Flatten Image to group all of layers
Step 15: Press Ctrl+J to double the Layer that has been Flatten. The go to
Filter >Blur>Gaussian blur… and set values as illustrated
Use Erase (E) tool to erase mod (value of 100%)
Step 16: use Brush (B) tool, press F5 button to open Brushes table, and then select parameters as follows
Brush tool 2 in Photoshop
Select foreground as white and background as black
Use hard brush tool, set Opacity to 50%, then brush here and there like this
After brushing, let’s change mixing mode of this layer to Overlay
Finished, here is the final work. La la la
FINISHED ! HAVE A GOOD JOB !


