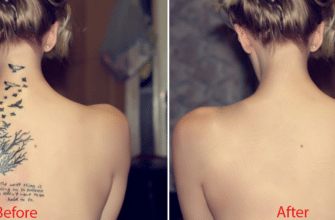
How to smooth skin and remove pimples in Photoshop. You have a nice face photo. Unfortunately, some acnes or pimples on the face and you want to remove them. Ance common appear to be among young people. So that, ance is a cause of terrible photos. How to remove them ? Keep calm. In this tutorial, I will show how to remove acne and smooth skin in Photoshop CS6. This tutorial have been tested in Photoshop CS5, CS4, CS3 and Photoshop CC. Dividing by two step:
– First step : Remove acne or pimples in Photoshop CS6
– Second step : make smooth skin in Photoshop CS6
Some functions of Photoshop CS6 are used in this tutorial : Patch tool, Duplicate layer, Filter -> Noise -> Median , Eraser tool, zoom in, zoom out.
Before removing acne and no smooth skin

Before Removing acne
After removing pimples and smooth skin in Photoshop CS6

After remove acne and smooth skin in photoshop cs6
I/ First step : Remove acne or pimples in Photoshop CS6
1/ Launch and open this photo in Photoshop CS6, You should zoom in to do easily.
2/ Layer 1 is copied Background layer by using Duplicate layer :
– Right click on Background layer then seclect Duplicate layer

Create layer 1 by using duplicate layer
A new dialog box open, rename Background Layer copy to Layer 1

Layer-1 remove ance
Click Ok and locked Background layer.
To remove acne, you should use patch tool ( How to use patch tool in photoshop cs6 ). Choose a area acne skin then drag to good area skin and drop mouse.

Remove acne using path tool in Photoshop CS6
Repeat this action, we will have a good skin face on layer 1. But this skin is really not smooth. In second step, I will show how to smooth skin.

New layer 1 remove acne
II/ Second step : Smooth skin in Photoshop CS6
1 / Create Layer 1 copy name by using duplicate layer tool.
2/ On “layer 1 Copy” : Go to Filter -> Noise -> Median… A new dialog box open, enter 3 in Radius option.

Making smooth skin photoshop cs6
Click OK
3/ We see that eye, eyebrow and lip are grew dim. We will delete them on “Layer 1 copy”
Using Erase tool to delete them.

delete area on layer 1 copy
3/ Unclocked layer 1 copy. Produce

After remove acne and smooth skin in photoshop cs6
Download file PSD for this tutorial :
Thanks for your reading !


Great work! I like how you smooth out effects of the patch tool with a blur filter. Another option I like to use (depending on the photo) is spot healing brush + regular brush to smooth out anything. It can keep a little more texture sometimes.Thanks for your article
In this post . I show you best youtube channel of photoshop tutorials . best and amazing photoshop tutorials