Here are some simple types of photo frames that you can make easily; three different photo frame styles in Photoshop is showed in the article below.
Frame 1:
Step 1: Open your image in Photoshop then press Ctrl + Shift + Alt + N to create a new layer (Layer 1)
Press Ctrl + A (to create a selection for the image) then press D key (to return two color boxes to default B&W).
Go to Edit/Stroke to open Stroke Panel and then set: Width: 35 pixels; Location: Inside and click OK.
Step 2: Press Ctrl + D (remove selection) then press V key and reduce Opacity of Layer 1 to 40%.
Press W key to choose Magic Wand Tool and click on the center of the image to make a selection
Step 3: Press Ctrl + Shift + Alt + N to create a new layer (Layer 2) and then press X key to choose white color in Foreground color box.
Go to Edit/Stroke to open Stroke Panel and then set: Width: 1 px; Location: Center then click OK.
Step 4: Press Ctrl + D (remove selection) then press V key and reduce Opacity of Layer 1 to 50%. Here is the way to complete frame 1.
Frame 2:
Step 1: To make this type of frame, you should return to frame 1 and do step 1 again, but you must increase the value of from 35 pixels to 60 pixels, and you will get the result as below:

Step 3: Press E to select Eraser Tool and large zoom images to delete some image areas that need to be removed as shown below.
And here is the result:

Step 1: Follow the ways to make Frame A, but in step 3 you change the value of Width: 35 pixels into Width: 15 pixels, you will get the picture below.
Step 2: Mix colors for Background color box according to your preferences (in this example I choose black color, so I just press D and then press X).
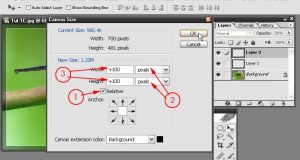
Go to Image/Canvas size to open Canvas Size and set as shown below.
This step should be noted to act in correct orders:
+ Check Relative box
+ Select units (pixels)
+ Type the value (magnitude) for borders (+100)
+ Click OK
Coming here is completed frame 3:


