Photoshop is such a powerful Lamborghini in the world of photo editing software. It is a great software that can help you bring the magic to your photos by using different tools. Photoshop is also a place for young people who love the graphic shown their creative abilities. However, this software is really complicated for beginners who want to be get up with graphic applications in general and Photoshop in particular. They have to face with the difficulty that there are too many tools and functions in this software. Photoshop is extremely a large world , it gives designers the right to express their creative abilities, be with PhotoshopTip.com learn 10 great tips that you can do to make your designs more impressive.
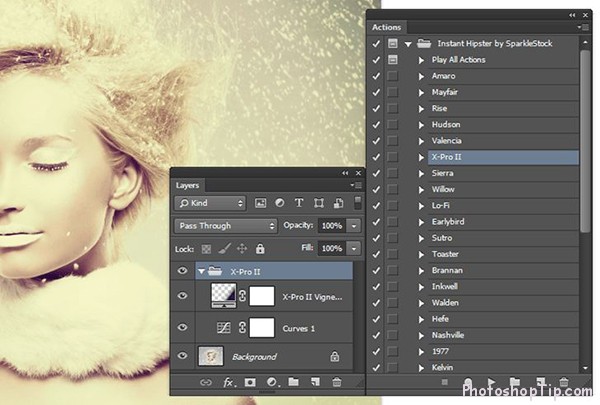
1. Bring gorgeous Instagram’s color filters into Photoshop

Have you ever wanted your photo looks more interesting without mobile apps yet? to download Photoshop actions to help your pictures become more impressive and similar to Instagram’s color filters.
2. Make your photo become brighter
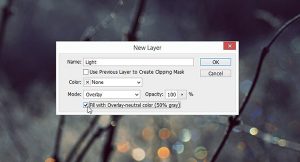
If you have a gloomy photo, the tutorial below can help you to improve this problem quickly and effectively. First, you need to press Shift + Ctrl + N to create a new layer named “Light” or whatever name you want then choose its transfer mode to Overlay and tick on “Fill with Overlay – neutral color 50% gray“. Next, you turn on Dodge Tool and set Exposure Parameters around 25%, click on Highlights, Midtones or Shadows to impact in your photos lighting. You can also use Burn Tool to enhance Shadows.
3. Edit images of the same batch
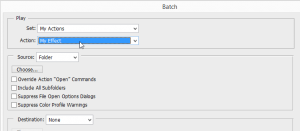
If you have lots of images need to be modified and it only uses an operation in general, you can following these steps to shorten your time. First, you must add all the images need to be edited into a folder, and then open any picture and begin editing during recording the action (Window> Actions). After creating action, choose File > Automate > Batch, select the action you saved before then click OK and Photoshop will do all the rest.
4. Remove oily skin quickly
If you are editing a portrait, you can use Eyedropper Tool to select areas of skin that is not oily and then cover on oily skin areas with Brush in Normal and 15% of Opacity. This way will help the oily skin becomes more shiny and smooth.
5. Enhance your color palette
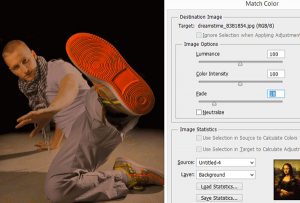
If you have a picture with fairly boring colors, you can absolutely use the color of the classic paintings such as the Mona Lisa or Hopper to make your color photos. To do this, you simply select Image> Adjustments> Match Color and then choose a famous painting or any picture you like, click OK to see the changes.
6. Draw a straight line with the Paintbrush tool

Unless you have an extremely strong wrist, drawing a straight line over the image is a very difficult problem. To improve this, you can hold down Shift key while using Brush Tool and it will automatically draw a straight line for you.
7. Add watermark easily

If you need to add your logo for multiple images at once, you can save your time by turning it into a brush preset. To do this, go to Edit> Define Brush Preset and upload your logo.
8. Make your photo more likely
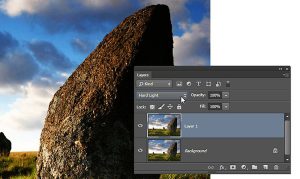
There is a very simple way to make your photos more lively: Press Control + J to duplicate layer, and then set the new layer to Hard light mode, you will immediately realize that your photos will become more colorful and vivid.
9. Remove the long circular strokes in Paintbrush tool
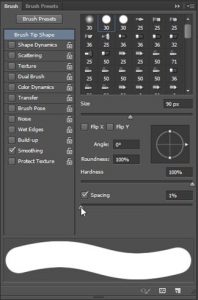
If you draw a line with the Paintbrush tool, it will create a circular trace at both sides of the line (it is because of the division of the pixels in the digital format), to create a flat stroke, select a brush and then press F5 to open it. Next, select the Brush Tip Shape and change the distance from 25% to less than 7%. You can save this brush and select it to use immediately.
10. Zoom the viewing from above
If you want to zoom closer to a certain area, you can hold H key and move on your photo, full-screen viewing will instantly switch to the view you selected. However, you need a graphics card that supports OpenCL to do this.